FireSat+ Test Suite
This tutorial contains information for those who are just starting out and builds up to show how complex test suites can be built.
Introduction
NOS-T
The New Observing Strategies Testbed (NOS-T) is a computational environment designed to develop, test, mature, and socialize innovative operating concepts and technologies for NASA’s New Observing Strategies (NOS). It provides a robust infrastructure that enables the integration and orchestration of user-contributed applications to simulate system-of-systems test cases, allowing for true distributed control over constituent systems. This environment empowers principal investigators to conduct virtual Earth science mission simulations, systematically varying parameters to evaluate the effectiveness of proposed observing strategies. The resulting data and outcomes support the advancement of technology readiness levels and foster innovation in Earth science measurement techniques.
At the core of NOS-T is a loosely coupled, event-driven architecture (EDA), where applications communicate state changes through event notifications transmitted over a network. These events, encapsulated as message payloads, carry the necessary data to reflect system state transitions. This architecture enhances scalability and reliability by replicating event-handling functions across infrastructure instances, while maintaining modularity through a simple event-handling interface. NOS-T also aligns with service-oriented architecture (SOA) principles, as applications can trigger services in response to specific events.
A key component of this architecture is the event broker (or message broker), which centralizes communication by managing the exchange of event notifications between applications. Rather than requiring direct connections between all applications, each client connects only to the broker, simplifying the communication topology and improving system manageability. This design enables seamless coordination among user applications and the NOS-T manager application via a shared information system infrastructure, facilitating the execution of complex, distributed Earth science mission scenarios.
FireSat+ Test Suite
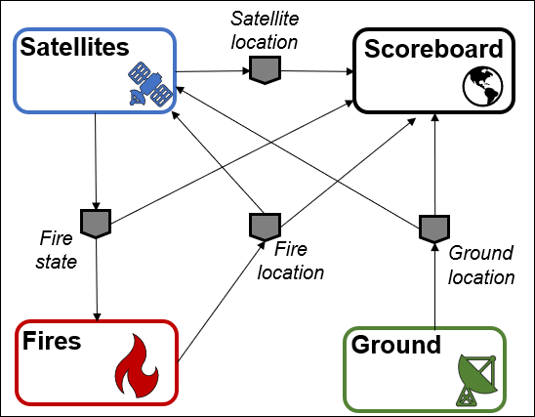
The FireSat+ test suite is a hands-on example of how to use the NOS-T Tools library to create a test suite. It contains five applications:
Fires: Publishes historical fire data.
Ground: Models a ground station in Svalbard, Norway.
Satellites: Models a constellation of spacecraft observing and reporting the fires.
Manager: Orchestrates the simulation timing and execution
Scoreboard: Geospatial visualization tool that displays the data from the other applications.
The operational concept for FireSat+ is that one or several satellites are searching for fires. The fires are ignited following a historical dataset. When one of the satellites orbit above these locations, it will detect the fire. Finally, once that satellite is in range of a ground station, it will report the fire.
A graphical representation of the FireSat+ message flows and their payloads is shown below:
See also
For more information on FireSat+, please refer to the following resources:
Setup
This section will show you how to set up NOS-T assuming you are a beginner to both coding and the testbed. The setup phase involves:
Integrated Development Environment Installation
NOS-T Tools Installation
RabbitMQ Event Broker Setup
Repository Cloning
Integrated Development Environment Installation
An Integrated Development Environment (IDE) will make developing applications and interacting with NOS-T much easier. Below is a list of recommended IDEs:
Visual Studio Code (VS Code): Lightweight, highly customizable, supports many languages via extensions.
IntelliJ IDEA: Excellent for Java and Kotlin, with strong support for other JVM languages.
Eclipse: Popular for Java development, also supports C/C++, Python, and more.
PyCharm: Feature-rich Python IDE by JetBrains, great for web development and data science.
Note
Users are encouraged to use VS Code due to its lightweight design, ease of setup, and strong community support. It also offers built-in support for Jupyter notebooks, making it especially helpful for getting started with NOS-T development.
NOS-T Tools Installation
The NOS-T Tools library is available on PyPi and can be installed using pip, the standard package manager for Python or conda. Below are the instructions for both methods.
Pip
To install NOS-T tools using pip, follow these steps:
Upgrade
pipto the latest version:
python -m pip install --upgrade pip
Install NOS-T Tools:
python3 -m pip install nost-tools
To install additional libraries required to run the NOS-T Tools examples:
python3 -m pip install "nost_tools[examples]"
Conda
For instructions on how to install Conda, see the: Conda documentation.
To install NOS-T tools using conda:
Create a new conda environment (recommended):
conda create -n nost python=3.11
conda activate nost
Install NOS-T tools:
python3 -m pip install nost-tools
To install additional libraries required to run the examples:
python3 -m pip install "nost_tools[examples]"
Note
Following the instructions above will install the Python packages that the test suite depends on to run. The details of these dependencies, including version numbers, can otherwise be found in the requirements file.
RabbitMQ Event Broker Setup
Refer to the RabbitMQ Broker on Local Host guide for instructions on how to set up a RabbitMQ event broker locally.
Important
The test suite uses a RabbitMQ event broker to facilitate communication between applications. Ensure that your RabbitMQ broker is running and accessible before proceeding with the test suite.
Repository Cloning
The recommended way to access the example code is by cloning the NOS-T Tools repository from GitHub. If you’re unfamiliar with how to clone a Git repository, you can find detailed instructions here.
Clone the repository:
git clone git@github.com:code-lab-org/nost-tools.git
If the above fails, you can also try the HTTPS version:
git clone https://github.com/code-lab-org/nost-tools.git
This will create a directory called nost-tools in your current working directory. Inside this directory, you will find the example code under the examples/firesat/ folder.
Component Applications Overview
The FireSat+ test suite consists of several applications. Below is an overview of the main applications involved in the FireSat+ test suite: Satellites and Manager.
Note
The Fires, Ground, and Scoreboard applications are not covered in this tutorial, but you can find more information about them here.
Satellites
A key component of the FireSat+ test suite is the Satellite application (main_constellation.py). This application enables the user to generate a satellite constellation using the NOS-T Tools library, leveraging predefined templates to construct a model of a real-life constellation. You will be guided through the how each code block works, to help understand the purpose of different components in an application.
The first section of the code includes import statements that bring in the necessary dependencies for building the application. The imports at the top are standard Python libraries, while those at the bottom are sourced from the NOS-T tools library.
import copy
import logging
from datetime import timedelta
import numpy as np
import pandas as pd
from skyfield.api import EarthSatellite, load, wgs84
The next section imports the message schema configuration, which defines the structure for how Satellites transmit data.
from constellation_config_files.schemas import (
    FireDetected,
    FireReported,
    FireStarted,
    GroundLocation,
    SatelliteStatus,
)
A logger is initialized for monitoring the behavior and flow of the program. You can find more details about the different logging levels here.
logging.basicConfig(level=logging.INFO)
logger = logging.getLogger(__name__)
Following that, the function compute_min_elevation calculates the minimum elevation angle necessary for a satellite to observe a specific point from its current position. It takes two parameters: altitude and field_of_regard. These inputs are used in mathematical computations to determine and return the minimum elevation angle in degrees.
def compute_min_elevation(altitude, field_of_regard):
    """
    Computes the minimum elevation angle required for a satellite to observe a point from current location.

    Args:
        altitude (float): Altitude (meters) above surface of the observation
        field_of_regard (float): Angular width (degrees) of observation

    Returns:
        float : min_elevation
            The minimum elevation angle (degrees) for observation
    """
    earth_equatorial_radius = 6378137.000000000
    earth_polar_radius = 6356752.314245179
    earth_mean_radius = (2 * earth_equatorial_radius + earth_polar_radius) / 3

    # eta is the angular radius of the region viewable by the satellite
    sin_eta = np.sin(np.radians(field_of_regard / 2))
    # rho is the angular radius of the earth viewed by the satellite
    sin_rho = earth_mean_radius / (earth_mean_radius + altitude)
    # epsilon is the min satellite elevation for obs (grazing angle)
    cos_epsilon = sin_eta / sin_rho
    if cos_epsilon > 1:
        return 0.0
    return np.degrees(np.arccos(cos_epsilon))
Next, the compute_sensor_radius function pulls in the result of compute_min_elevation and the altitude value to return sensor_radius, which provides the radius of the nadir pointing sensor’s circular view projected onto Earth.
def compute_sensor_radius(altitude, min_elevation):
    """
    Computes the sensor radius for a satellite at current altitude given minimum elevation constraints.

    Args:
        altitude (float): Altitude (meters) above surface of the observation
        min_elevation (float): Minimum angle (degrees) with horizon for visibility

    Returns:
        float : sensor_radius
            The radius (meters) of the nadir pointing sensors circular view of observation
    """
    earth_equatorial_radius = 6378137.0
    earth_polar_radius = 6356752.314245179
    earth_mean_radius = (2 * earth_equatorial_radius + earth_polar_radius) / 3
    # rho is the angular radius of the earth viewed by the satellite
    sin_rho = earth_mean_radius / (earth_mean_radius + altitude)
    # eta is the nadir angle between the sub-satellite direction and the target location on the surface
    eta = np.degrees(np.arcsin(np.cos(np.radians(min_elevation)) * sin_rho))
    # calculate swath width half angle from trigonometry
    sw_HalfAngle = 90 - eta - min_elevation
    if sw_HalfAngle < 0.0:
        return 0.0
    return earth_mean_radius * np.radians(sw_HalfAngle)
The get_elevation_angle is a function that uses the Skyfield library. It accepts the parameters t, sat, and loc. The first two, respectively, represent the Skyfield time object, the Skyfield EarthSat object. The third is the latitude/longitude of the spacecraft’s subpoint, along with the spacecraft altitude. It returns an elevation angle in respect to the topocentric horizon.
def get_elevation_angle(t, sat, loc):
    """
    Returns the elevation angle (degrees) of satellite with respect to the topocentric horizon.

    Args:
        t (:obj:`Time`): Time object of skyfield.timelib module
        sat (:obj:`EarthSatellite`): Skyview EarthSatellite object from skyfield.sgp4lib module
        loc (:obj:`GeographicPosition`): Geographic location on surface specified by latitude-longitude from skyfield.toposlib module

    Returns:
        float : alt.degrees
            Elevation angle (degrees) of satellite with respect to the topocentric horizon
    """
    difference = sat - loc
    topocentric = difference.at(t)
    # NOTE: Topos uses term altitude for what we are referring to as elevation
    alt, az, distance = topocentric.altaz()
    return alt.degrees
These two functions, check_in_view and check_in_range, affirm if the elevation angle and immediate location of the satellite enable it to connect to a ground station and view regions on Earth.
def check_in_view(t, satellite, topos, min_elevation):
    """
    Checks if the elevation angle of the satellite with respect to the ground location is greater than the minimum elevation angle constraint.

    Args:
        t (:obj:`Time`): Time object of skyfield.timelib module
        satellite (:obj:`EarthSatellite`): Skyview EarthSatellite object from skyfield.sgp4lib module
        topos (:obj:`GeographicPosition`): Geographic location on surface specified by latitude-longitude from skyfield.toposlib module
        min_elevation (float): Minimum elevation angle (degrees) for ground to be in view of satellite, as calculated by compute_min_elevation

    Returns:
        bool : isInView
            True/False indicating visibility of ground location to satellite
    """
    isInView = False
    elevationFromFire = get_elevation_angle(t, satellite, topos)
    if elevationFromFire >= min_elevation:
        isInView = True
    return isInView
def check_in_range(t, satellite, grounds):
    """
    Checks if the satellite is in range of any of the operational ground stations.

    Args:
        t (:obj:`Time`): Time object of skyfield.timelib module
        satellite (:obj:`EarthSatellite`): Skyview EarthSatellite object from skyfield.sgp4lib module
        grounds (:obj:`DataFrame`): Dataframe of ground station locations, minimum elevation angles for communication, and operational status (T/F)

    Returns:
        bool, int :
            isInRange
                True/False indicating visibility of satellite to any operational ground station
            groundId
                groundId of the ground station currently in comm range (NOTE: If in range of two ground stations simultaneously, will return first groundId)
    """
    isInRange = False
    groundId = None
    for k, ground in grounds.iterrows():
        if ground.operational:
            groundLatLon = wgs84.latlon(ground.latitude, ground.longitude)
            satelliteElevation = get_elevation_angle(t, satellite, groundLatLon)
            if satelliteElevation >= ground.elevAngle:
                isInRange = True
                groundId = k
                break
    return isInRange, groundId
Constellation class
The next section of code blocks define the Constellation class. In object-oriented programming, a class is a replicable object that can be assigned unique parameters to generate a diverse collection of similar objects. The Constellation class leverages the NOS-T tools library ‘Entity’ object class to construct the constellation chain.
The first two functions in the Constellation class, init and initialize, prepare the test run for startup by initializing data.
class Constellation(Entity):
    """
    *This object class inherits properties from the Entity object class in the NOS-T tools library*

    Args:
        cName (str): A string containing the name for the constellation application
        app (:obj:`ManagedApplication`): An application containing a test-run namespace, a name and description for the app, client credentials, and simulation timing instructions
        id (list): List of unique *int* ids for each satellite in the constellation
        names (list): List of unique *str* for each satellite in the constellation (must be same length as **id**)\n
        ES (list): Optional list of :obj:`EarthSatellite` objects to be included in the constellation (NOTE: at least one of **ES** or **tles** MUST be specified, or an exception will be thrown)\n
        tles (list): Optional list of Two-Line Element *str* to be converted into :obj:`EarthSatellite` objects and included in the simulation

    Attributes:
        fires (list): List of fires with unique fireId (*int*), ignition (:obj:`datetime`), and latitude-longitude location (:obj:`GeographicPosition`) - *NOTE:* initialized as [ ]
        grounds (:obj:`DataFrame`): Dataframe containing information about ground stations with unique groundId (*int*), latitude-longitude location (:obj:`GeographicPosition`), min_elevation (*float*) angle constraints, and operational status (*bool*) - *NOTE:* initialized as **None**
        satellites (list): List of :obj:`EarthSatellite` objects included in the constellation - *NOTE:* must be same length as **id**
        detect (list): List of detected fires with unique fireId (*int*), detected :obj:`datetime`, and name (*str*) of detecting satellite - *NOTE:* initialized as [ ]
        report (list): List of reported fires with unique fireId (*int*), reported :obj:`datetime`, name (*str*) of reporting satellite, and groundId (*int*) of ground station reported to - *NOTE:* initialized as [ ]
        positions (list): List of current latitude-longitude-altitude locations (:obj:`GeographicPosition`) of each satellite in the constellation - *NOTE:* must be same length as **id**
        next_positions (list): List of next latitude-longitude-altitude locations (:obj:`GeographicPosition`) of each satellite in the constellation - *NOTE:* must be same length as **id**
        min_elevations_fire (list): List of *floats* indicating current elevation angle (degrees) constraint for visibility by each satellite - *NOTE:* must be same length as **id**, updates every time step

    """

    ts = load.timescale()
    PROPERTY_FIRE_REPORTED = "reported"
    PROPERTY_FIRE_DETECTED = "detected"
    PROPERTY_POSITION = "position"

    def __init__(self, cName, app, id, names, ES=None, tles=None):
        super().__init__(cName)
        self.app = app
        self.id = id
        self.names = names
        self.fires = []
        self.grounds = None
        self.satellites = []
        if ES is not None:
            for satellite in ES:
                self.satellites.append(satellite)
        if tles is not None:
            for i, tle in enumerate(tles):
                self.satellites.append(
                    EarthSatellite(tle[0], tle[1], self.names[i], self.ts)
                )
        self.detect = []
        self.report = []
        self.positions = self.next_positions = [None for satellite in self.satellites]
        self.min_elevations_fire = [
            compute_min_elevation(
                wgs84.subpoint(satellite.at(satellite.epoch)).elevation.m,
                config.rc.application_configuration["FIELD_OF_REGARD"][i],
            )
            for i, satellite in enumerate(self.satellites)
        ]

    def initialize(self, init_time):
        """
        Activates the :obj:`Constellation` at a specified initial scenario time

        Args:
            init_time (:obj:`datetime`): Initial scenario time for simulating propagation of satellites
        """
        super().initialize(init_time)
        self.grounds = pd.DataFrame(
            {
                "groundId": pd.Series([], dtype="int"),
                "latitude": pd.Series([], dtype="float"),
                "longitude": pd.Series([], dtype="float"),
                "elevAngle": pd.Series([], dtype="float"),
                "operational": pd.Series([], dtype="bool"),
            }
        )
        self.positions = self.next_positions = [
            wgs84.subpoint(satellite.at(self.ts.from_datetime(init_time)))
            for satellite in self.satellites
        ]
The next two functions, tick and tock, are very important for executing time-managed test suites. Generally, the tick function computes the current state of an application. Any cumbersome functions like simulations should be performed here. The tock function commits the state changes. You want this done as quickly as possible to maintain consistent timing between applications.
    def tick(self, time_step):
        """
        Computes the next :obj:`Constellation` state after the specified scenario duration and the next simulation scenario time

        Args:
            time_step (:obj:`timedelta`): Duration between current and next simulation scenario time
        """
        super().tick(time_step)
        self.next_positions = [
            wgs84.subpoint(
                satellite.at(self.ts.from_datetime(self.get_time() + time_step))
            )
            for satellite in self.satellites
        ]
        for i, satellite in enumerate(self.satellites):
            then = self.ts.from_datetime(self.get_time() + time_step)
            self.min_elevations_fire[i] = compute_min_elevation(
                float(self.next_positions[i].elevation.m),
                config.rc.application_configuration["FIELD_OF_REGARD"][i],
            )
            for j, fire in enumerate(self.fires):
                if self.detect[j][self.names[i]] is None:
                    topos = wgs84.latlon(fire["latitude"], fire["longitude"])
                    isInView = check_in_view(
                        then, satellite, topos, self.min_elevations_fire[i]
                    )
                    if isInView:
                        self.detect[j][self.names[i]] = (
                            self.get_time() + time_step
                        )  # TODO could use event times
                        if self.detect[j]["firstDetector"] is None:
                            self.detect[j]["firstDetect"] = True
                            self.detect[j]["firstDetector"] = self.names[i]
                if (self.detect[j][self.names[i]] is not None) and (
                    self.report[j][self.names[i]] is None
                ):
                    isInRange, groundId = check_in_range(then, satellite, self.grounds)
                    if isInRange:
                        self.report[j][self.names[i]] = self.get_time() + time_step
                        if self.report[j]["firstReporter"] is None:
                            self.report[j]["firstReport"] = True
                            self.report[j]["firstReporter"] = self.names[i]
                            self.report[j]["firstReportedTo"] = groundId

    def tock(self):
        """
        Commits the next :obj:`Constellation` state and advances simulation scenario time

        """
        self.positions = self.next_positions
        for i, newly_detected_fire in enumerate(self.detect):
            if newly_detected_fire["firstDetect"]:
                detector = newly_detected_fire["firstDetector"]
                self.notify_observers(
                    self.PROPERTY_FIRE_DETECTED,
                    None,
                    {
                        "fireId": newly_detected_fire["fireId"],
                        "detected": newly_detected_fire[detector],
                        "detected_by": detector,
                    },
                )
                self.detect[i]["firstDetect"] = False
        for i, newly_reported_fire in enumerate(self.report):
            if newly_reported_fire["firstReport"]:
                reporter = newly_reported_fire["firstReporter"]
                self.notify_observers(
                    self.PROPERTY_FIRE_REPORTED,
                    None,
                    {
                        "fireId": newly_reported_fire["fireId"],
                        "reported": newly_reported_fire[reporter],
                        "reported_by": reporter,
                        "reported_to": newly_reported_fire["firstReportedTo"],
                    },
                )
            self.report[i]["firstReport"] = False
        super().tock()
The next function, on_fire, checks the current simulation time vs. a database of actual fires detected by an space-based infrared sensor. This function then publishes a message containing information about the fire. It also maintains an internal database for when fires are detected and reported, and which satellite did the detecting/reporting.
    def on_fire(self, ch, method, properties, body):  # , client, userdata, message):
        """
        Callback function appends a dictionary of information for a new fire to fires :obj:`list` when message detected on the *PREFIX.fires.location* topic

        Args:
            ch (:obj:`Channel`): Channel object used to communicate with the event broker
            method (:obj:`Method`): Method object containing information about the message delivery, such as delivery tag and exchange
            properties (:obj:`Properties`): Properties object containing metadata about the message, such as content type and message ID
            body (:obj:`bytes`): Contains the message content as a byte string, which is decoded to a UTF-8 string and then parsed into a :obj:`FireStarted` object
        """
        body = body.decode("utf-8")

        started = FireStarted.model_validate_json(body)  # message.payload)
        self.fires.append(
            {
                "fireId": started.fireId,
                "start": started.start,
                "latitude": started.latitude,
                "longitude": started.longitude,
            },
        )
        satelliteDictionary = dict.fromkeys(
            self.names
        )  # Creates dictionary where keys are satellite names and values are defaulted to NoneType
        satelliteDictionary["fireId"] = (
            started.fireId
        )  # Adds fireId to dictionary, which will coordinate with position of dictionary in list of dictionaries
        detectDictionary = copy.deepcopy(satelliteDictionary)
        detectDictionary["firstDetect"] = False
        detectDictionary["firstDetector"] = None
        self.detect.append(detectDictionary)
        reportDictionary = copy.deepcopy(satelliteDictionary)
        reportDictionary["firstReport"] = False
        reportDictionary["firstReporter"] = None
        reportDictionary["firstReportedTo"] = None
        self.report.append(reportDictionary)
The final block of the Constellation class is next. It contains the on_ground function which is used to collect information on ground station locations and elevation angles when those messages are published.
    def on_ground(self, ch, method, properties, body):  # client, userdata, message):
        """
        Callback function appends a dictionary of information for a new ground station to grounds :obj:`list` when message detected on the *PREFIX/ground/location* topic. Ground station information is published at beginning of simulation, and the :obj:`list` is converted to a :obj:`DataFrame` when the Constellation is initialized.

        Args:
            ch (:obj:`Channel`): Channel object used to communicate with the event broker
            method (:obj:`Method`): Method object containing information about the message delivery, such as delivery tag and exchange
            properties (:obj:`Properties`): Properties object containing metadata about the message, such as content type and message ID
            body (:obj:`bytes`): Contains the message content as a byte string, which is decoded to a UTF-8 string and then parsed into a :obj:`FireStarted` object
        """
        body = body.decode("utf-8")

        location = GroundLocation.model_validate_json(body)  # message.payload)

        if location.groundId in self.grounds.groundId:
            self.grounds[self.grounds.groundId == location.groundId].latitude = (
                location.latitude
            )
            self.grounds[self.grounds.groundId == location.groundId].longitude = (
                location.longitude
            )
            self.grounds[self.grounds.groundId == location.groundId].elevAngle = (
                location.elevAngle
            )
            self.grounds[self.grounds.groundId == location.groundId].operational = (
                location.operational
            )
            print(f"Station {location.groundId} updated at time {self.get_time()}.")
        else:
            location = {
                "groundId": location.groundId,
                "latitude": location.latitude,
                "longitude": location.longitude,
                "elevAngle": location.elevAngle,
                "operational": location.operational,
            }

            # Create a DataFrame from the location dictionary
            new_data = pd.DataFrame([location])

            # Concatenate the new data with the existing DataFrame
            self.grounds = pd.concat([self.grounds, new_data], ignore_index=True)
Position Publisher Class
The next class in the Satellites application is the Position Publisher. This class takes the satellite location information from the Constellation class and publishes it over the NOS-T infrastructre. These messages are used for the Scoreboard application, which is a geospatial visualization tool.
class PositionPublisher(WallclockTimeIntervalPublisher):
    """
    *This object class inherits properties from the WallclockTimeIntervalPublisher object class from the publisher template in the NOS-T tools library*

    The user can optionally specify the wallclock :obj:`timedelta` between message publications and the scenario :obj:`datetime` when the first of these messages should be published.

    Args:
        app (:obj:`ManagedApplication`): An application containing a test-run namespace, a name and description for the app, client credentials, and simulation timing instructions
        constellation (:obj:`Constellation`): Constellation :obj:`Entity` object class
        time_status_step (:obj:`timedelta`): Optional duration between time status 'heartbeat' messages
        time_status_init (:obj:`datetime`): Optional scenario :obj:`datetime` for publishing the first time status 'heartbeat' message

    """

    def __init__(
        self, app, constellation, time_status_step=None, time_status_init=None
    ):
        super().__init__(app, time_status_step, time_status_init)
        self.constellation = constellation
        self.isInRange = [
            False for i, satellite in enumerate(self.constellation.satellites)
        ]

    def publish_message(self):
        """
        *Abstract publish_message method inherited from the WallclockTimeIntervalPublisher object class from the publisher template in the NOS-T tools library*

        This method sends a :obj:`SatelliteStatus` message to the *PREFIX/constellation/location* topic for each satellite in the constellation (:obj:`Constellation`).

        """
        for i, satellite in enumerate(self.constellation.satellites):
            next_time = constellation.ts.from_datetime(
                constellation.get_time() + 60 * self.time_status_step
            )
            satSpaceTime = satellite.at(next_time)
            subpoint = wgs84.subpoint(satSpaceTime)
            sensorRadius = compute_sensor_radius(
                subpoint.elevation.m, constellation.min_elevations_fire[i]
            )
            self.isInRange[i], groundId = check_in_range(
                next_time, satellite, constellation.grounds
            )
            self.app.send_message(
                self.app.app_name,
                "location",
                SatelliteStatus(
                    id=i,
                    name=satellite.name,
                    latitude=subpoint.latitude.degrees,
                    longitude=subpoint.longitude.degrees,
                    altitude=subpoint.elevation.m,
                    radius=sensorRadius,
                    commRange=self.isInRange[i],
                    time=constellation.get_time(),
                ).model_dump_json(),
            )
Fire Observer Classes
The next code block contains two different fire observation classes. The first of these is for detecting fires and the second is for reporting fires. The concept of operations for FireSat+ is that fires are first ignited, then detected when a satellite passes over them. Finally, the fires are reported when the detecting satellite is in range of a ground station for the data downlink. The Fire Observer classes publish this over the testbed for postprocessing of results, and for Scoreboard visualization.
class FireDetectedObserver(Observer):
    """
    *This object class inherits properties from the Observer object class from the observer template in the NOS-T tools library*

    Args:
        app (:obj:`ManagedApplication`): An application containing a test-run namespace, a name and description for the app, client credentials, and simulation timing instructions

    .. literalinclude:: /../../examples/firesat/satellites/main_constellation.py
        :pyobject: FireDetectedObserver.on_change
        :lines: 8-
    """

    def __init__(self, app):
        self.app = app

    def on_change(self, source, property_name, old_value, new_value):
        """
        *Standard on_change callback function format inherited from Observer object class in NOS-T tools library*

        In this instance, the callback function checks for notification of the "detected" property and publishes :obj:`FireDetected` message to *PREFIX/constellation/detected* topic:

        """
        if property_name == Constellation.PROPERTY_FIRE_DETECTED:
            self.app.send_message(
                self.app.app_name,
                "detected",
                FireDetected(
                    fireId=new_value["fireId"],
                    detected=new_value["detected"],
                    detected_by=new_value["detected_by"],
                ).model_dump_json(),
            )
class FireReportedObserver(Observer):
    """
    *This object class inherits properties from the Observer object class from the observer template in the NOS-T tools library*

    Args:
        app (:obj:`ManagedApplication`): An application containing a test-run namespace, a name and description for the app, client credentials, and simulation timing instructions

    .. literalinclude:: /../../examples/firesat/satellites/main_constellation.py
        :pyobject: FireReportedObserver.on_change
        :lines: 8-
    """

    def __init__(self, app):
        self.app = app

    def on_change(self, source, property_name, old_value, new_value):
        """
        *Standard on_change callback function format inherited from Observer object class in NOS-T tools library*

        In this instance, the callback function checks for notification of the "reported" property and publishes :obj:`FireReported` message to *PREFIX/constellation/reported* topic:

        """
        if property_name == Constellation.PROPERTY_FIRE_REPORTED:
            self.app.send_message(
                self.app.app_name,
                "reported",
                FireReported(
                    fireId=new_value["fireId"],
                    reported=new_value["reported"],
                    reported_by=new_value["reported_by"],
                    reported_to=new_value["reported_to"],
                ).model_dump_json(),
            )
The final block of code in the Satellites app is for initializing data and adding the functions and classes.
if __name__ == "__main__":
    # Define application name
    NAME = "constellation"

    # Load config
    config = ConnectionConfig(yaml_file="firesat.yaml", app_name=NAME)

    # Create the managed application
    app = ManagedApplication(app_name=NAME)

    # Load current TLEs for active satellites from Celestrak
    activesats_url = (
        "https://celestrak.org/NORAD/elements/gp.php?GROUP=active&FORMAT=tle"
    )
    activesats = load.tle_file(
        activesats_url, filename="satellites/active.txt", reload=True
    )

    by_name = {sat.name: sat for sat in activesats}
    names = [
        "AQUA",
        "TERRA",
        "SUOMI NPP",
        "NOAA 20 (JPSS-1)",  # "NOAA 20",
        "SENTINEL-2A",
        "SENTINEL-2B",
    ]

    ES = []
    indices = []
    for name_i, name in enumerate(names):
        ES.append(by_name[name])
        indices.append(name_i)

    # Initialize the Constellation object class (in this example from EarthSatellite type)
    constellation = Constellation("constellation", app, indices, names, ES)

    # Add observer classes to the Constellation object class
    constellation.add_observer(FireDetectedObserver(app))
    constellation.add_observer(FireReportedObserver(app))

    # Add the Constellation entity to the application's simulator
    app.simulator.add_entity(constellation)

    # Add a shutdown observer to shut down after a single test case
    app.simulator.add_observer(ShutDownObserver(app))

    # Add a position publisher to update satellite state every 5 seconds of wallclock time
    app.simulator.add_observer(
        PositionPublisher(app, constellation, timedelta(seconds=1))
    )

    # Start up the application
    app.start_up(
        config.rc.simulation_configuration.execution_parameters.general.prefix,
        config,
    )

    # Add message callbacks
    app.add_message_callback("fire", "location", constellation.on_fire)
    app.add_message_callback("ground", "location", constellation.on_ground)

    while True:
        pass
Manager
Maintaining a consistent simulation clock is important for many NOS-T use cases. For test suites that need to run faster than real time, it is an absolute necessity. The NOS-T Manager application (main_manager.py) is a good way to orchestrate all of the pieces for these types of tests. The manager is included in the NOS-T Tools library and will ensure that compliant applications start at the same time, and use a consistent simulation clock throughout the test run.
Next, we will go through the Manager code block-by-block to understand what it is doing. First, we have all of the import statements that the Manager relies on.
import logging

from nost_tools.application_utils import ShutDownObserver
from nost_tools.configuration import ConnectionConfig
from nost_tools.manager import Manager
from nost_tools.observer import Observer
from nost_tools.simulator import Mode, Simulator
Finally, the last line in the above code block sets up a logger to help you track what is going on. More info on the various levels can be found here.
logging.basicConfig(level=logging.INFO)
logger = logging.getLogger(__name__)


class DailyTimeScaleUpdater(Observer):
    """
    Observer that automatically speeds up the time scale factor at the start of each day.
    """

    def __init__(
        self,
        manager: Manager,
        fast_scale_factor: float = 120.0,
        slow_scale_factor: float = 60.0,
    ):
        """
        Initialize the daily time scale updater.

        Args:
            manager (Manager): The manager instance to send update requests
            fast_scale_factor (float): Time scale factor for daytime (default 120.0)
            slow_scale_factor (float): Time scale factor for nighttime (default 60.0)
        """
        self.manager = manager
        self.slow_scale_factor = slow_scale_factor
        self.fast_scale_factor = fast_scale_factor
        self.last_day_checked = None
        self.current_time_scale = None

    def on_change(self, source, property_name, old_value, new_value):
        """
        Callback when simulation properties change.

        Args:
            source: The object that changed
            property_name (str): Name of the property that changed
            old_value: Previous value
            new_value: New value
        """
        # Only respond to time changes when simulation is executing
        if (
            property_name == Simulator.PROPERTY_TIME
            and source.get_mode() == Mode.EXECUTING
            and new_value is not None
        ):

            current_sim_time = new_value
            current_day = current_sim_time.date()
            current_hour = current_sim_time.hour

            # Determine desired time scale based on time of day
            if 7 <= current_hour < 10 or 17 <= current_hour < 24:
                desired_time_scale = self.slow_scale_factor
            else:
                desired_time_scale = self.fast_scale_factor

            # Check if we've crossed into a new day or need to change time scale
            if (
                self.last_day_checked != current_day
                or self.current_time_scale != desired_time_scale
            ):

                logger.info(
                    f"Time scale update needed at {current_sim_time}: "
                    f"{self.current_time_scale} -> {desired_time_scale}"
                )

                # Request the time scale update from the manager
                self.manager.update(desired_time_scale, current_sim_time)

                # Update tracking variables
                self.last_day_checked = current_day
                self.current_time_scale = desired_time_scale
The next block of code loads configuration settings from a YAML configuration file. This file contains the parameters that will be used to run the test suite, such as the simulation duration, RabbitMQ connection details, and other application-specific settings. The YAML file is a convenient way to manage configuration settings without hardcoding them into the application code. The file is described below.
if __name__ == "__main__":
    # Load config
    config = ConnectionConfig(yaml_file="firesat.yaml")

    # Create the manager application
    manager = Manager()

    # Add the daily time scale updater observer
    manager.simulator.add_observer(
        DailyTimeScaleUpdater(
            manager,
            slow_scale_factor=config.rc.simulation_configuration.execution_parameters.manager.time_scale_factor,
            fast_scale_factor=120.0,
        )
    )

    # Add a shutdown observer to shut down after a single test case
    manager.simulator.add_observer(ShutDownObserver(manager))

    # Start up the manager
    manager.start_up(
        config.rc.simulation_configuration.execution_parameters.general.prefix,
        config,
    )

    manager.execute_test_plan()
Execution
There are a total of five files you will need to run for the FireSat+ test suite: three user applications, the NOS-T manager application, and the Scoreboard, a geospatial data visualization tool.
There are a few more steps necessary to run the FireSat+ test suite. You need to create a Cesium token to run the Scoreboard and set up environment files for each application.
YAML Configuration File
Each application reads a single YAML configuration file to access the parameters for the test case. The configuration file is located in the examples/firesat/ folder. The configuration file is named firesat.yaml and contains the following parameters:
info:
  title: Novel Observing Strategies Testbed (NOS-T) YAML Configuration
  version: '1.0.0'
  description: Version-controlled AsyncAPI document for RabbitMQ event broker with Keycloak authentication within NOS-T
servers:
  rabbitmq:
    keycloak_authentication: False
    host: "localhost"
    port: 5672
    tls: False
    virtual_host: "/"
    message_expiration: "60000"
    heartbeat: 600
    blocked_connection_timeout: 300
execution:
  general:
    prefix: greenfield
    wallclock_offset_refresh_interval: 60
    ntp_host: "time.nist.gov"
  application:
    shut_down_when_terminated: True
  manager:
    sim_start_time: "2019-12-31T23:59:59+00:00"
    sim_stop_time: "2020-01-01T10:00:00+00:00"
    start_time:
    time_step: "0:00:01"
    time_scale_factor: 60
    time_status_step: "0:00:01"
    is_scenario_time_status_step: False
    command_lead: "0:00:05"
    required_apps:
      - manager
      - fire
      - constellation
      - ground
    init_retry_delay_s: 5
    init_max_retry: 5
    set_offset: True
    shut_down_when_terminated: True
  managed_applications:
    fire:
      time_scale_factor: 60
      time_step: "0:00:01"
      is_scenario_time_step: False
      set_offset: True
      time_status_step: "0:00:10"
      is_scenario_time_status_step: False
      shut_down_when_terminated: True
      manager_app_name: "manager"
    constellation:
      time_scale_factor: 60
      time_step: "0:00:01"
      is_scenario_time_step: False
      set_offset: True
      time_status_step: "0:00:10"
      is_scenario_time_status_step: False
      shut_down_when_terminated: True
      manager_app_name: "manager"
      configuration_parameters:
        FIELD_OF_REGARD:
          - 110
          - 110
          - 112.56
          - 112.56
          - 20.6
          - 20.6
    ground:
      time_scale_factor: 60
      time_step: "0:00:01"
      is_scenario_time_step: False
      set_offset: True
      time_status_step: "0:00:10"
      is_scenario_time_status_step: False
      shut_down_when_terminated: True
      manager_app_name: "manager"
      configuration_parameters:
        stations:
          - groundId: 0
            latitude: 78.229772
            longitude: 15.407786
            elevAngle: 5.0
            operational: true
Note
For details about the YAML configuration file, refer to the YAML guide.
Cesium Access Token and Assets
The scoreboard application uses the Cesium geospatial visualization tool which requires getting an access token and an 3D Earth map asset. You will get an access token by signing in at the following link: https://cesium.com/ion/signin/tokens
After creating an account, you must add the Asset “Blue Marble Next Generation July, 2004” from the Asset Depot (ID 3845) to your account assets to enable visualization.
Setting Up Environment Files
The Scoreboard application is in .html, and pulls in credentials from a JavaScript file. To do this create a text file with the name “env.js” containing the following information:
var HOST="your event broker host URL"
var PORT="your event broker port"
var USERNAME="your event broker username"
var PASSWORD="your event broker password"
var TOKEN="your Cesium token (see Cesium installation instructions)"
For example, if you are running the test suite on your local computer using a local RabbitMQ event broker, you can set up the env.js file like this:
var HOST="localhost"
var PORT=15670
var USERNAME="admin"
var PASSWORD="admin"
var TOKEN="your Cesium token (see Cesium installation instructions)"
Note
For details on setting up a local RabbitMQ broker, refer to the RabbitMQ Broker on Local Host guide.
Executing the FireSat+ Test Suite
Finally, you need to run the five applications together in order to execute the FireSat+ test suite. These applications need to be logically separated when running. For the Python scripts, this can be done by running them on separate computers, by using separate consoles in Spyder, or separate terminals with VSCode. The Scoreboard is an .html file and can be run in a web browser, double-clicking the file should work. Each folder in the FireSat+ test suite has a code you need to run, they are:
main_fire.py - The Fires app publishes historical fire data.
main_ground.py - The Ground app models a ground station in Svalbard, Norway.
main_constellation.py - The Satellites app models the constellation of spacecraft observing and reporting the fires.
scoreboard.html - The aforementioned Scoreboard gives a view of what’s happening during a test run.
main_manager.py - The NOS-T Manager app orchestrates each test run by starting the other apps at the same time, maintaining a consistent time throughout, and shutting down the apps at the end.
Note
You must run the manager application (manager/main_manager.py) first, as it establishes the RabbitMQ exchange required to run the execution. Tt does not matter in which order you start the other applications.
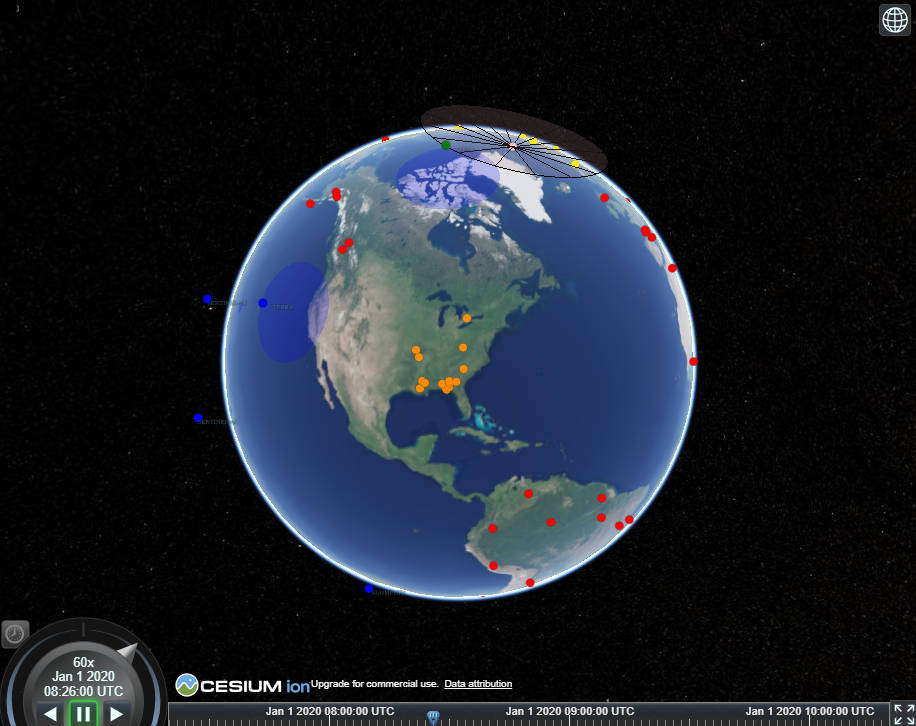
If everything is running correctly, the Scoreboard app should show an image similar to below.
Conclusion
This hands-on tutorial was developed to help users get started with NOS-T from a basic level. It begins with downloading an IDE for running scripts to interface with NOS-T and finishes with executing the FireSat+ example code. Some good next steps for learning other NOS-T functions and developing your own test suites can be found at the following links: